

That roof leak might not be from your shingles. It could be from failed metal flashing. This thin material is your home’s first defense against water damage at every joint and seam.
Ignoring flashing is like leaving a window open during a storm. Water will find its way in, ruining your walls and ceilings. The good news? Understanding metal flashing can save you thousands in repairs.
What Is Metal Flashing and Why Every Roof Needs It
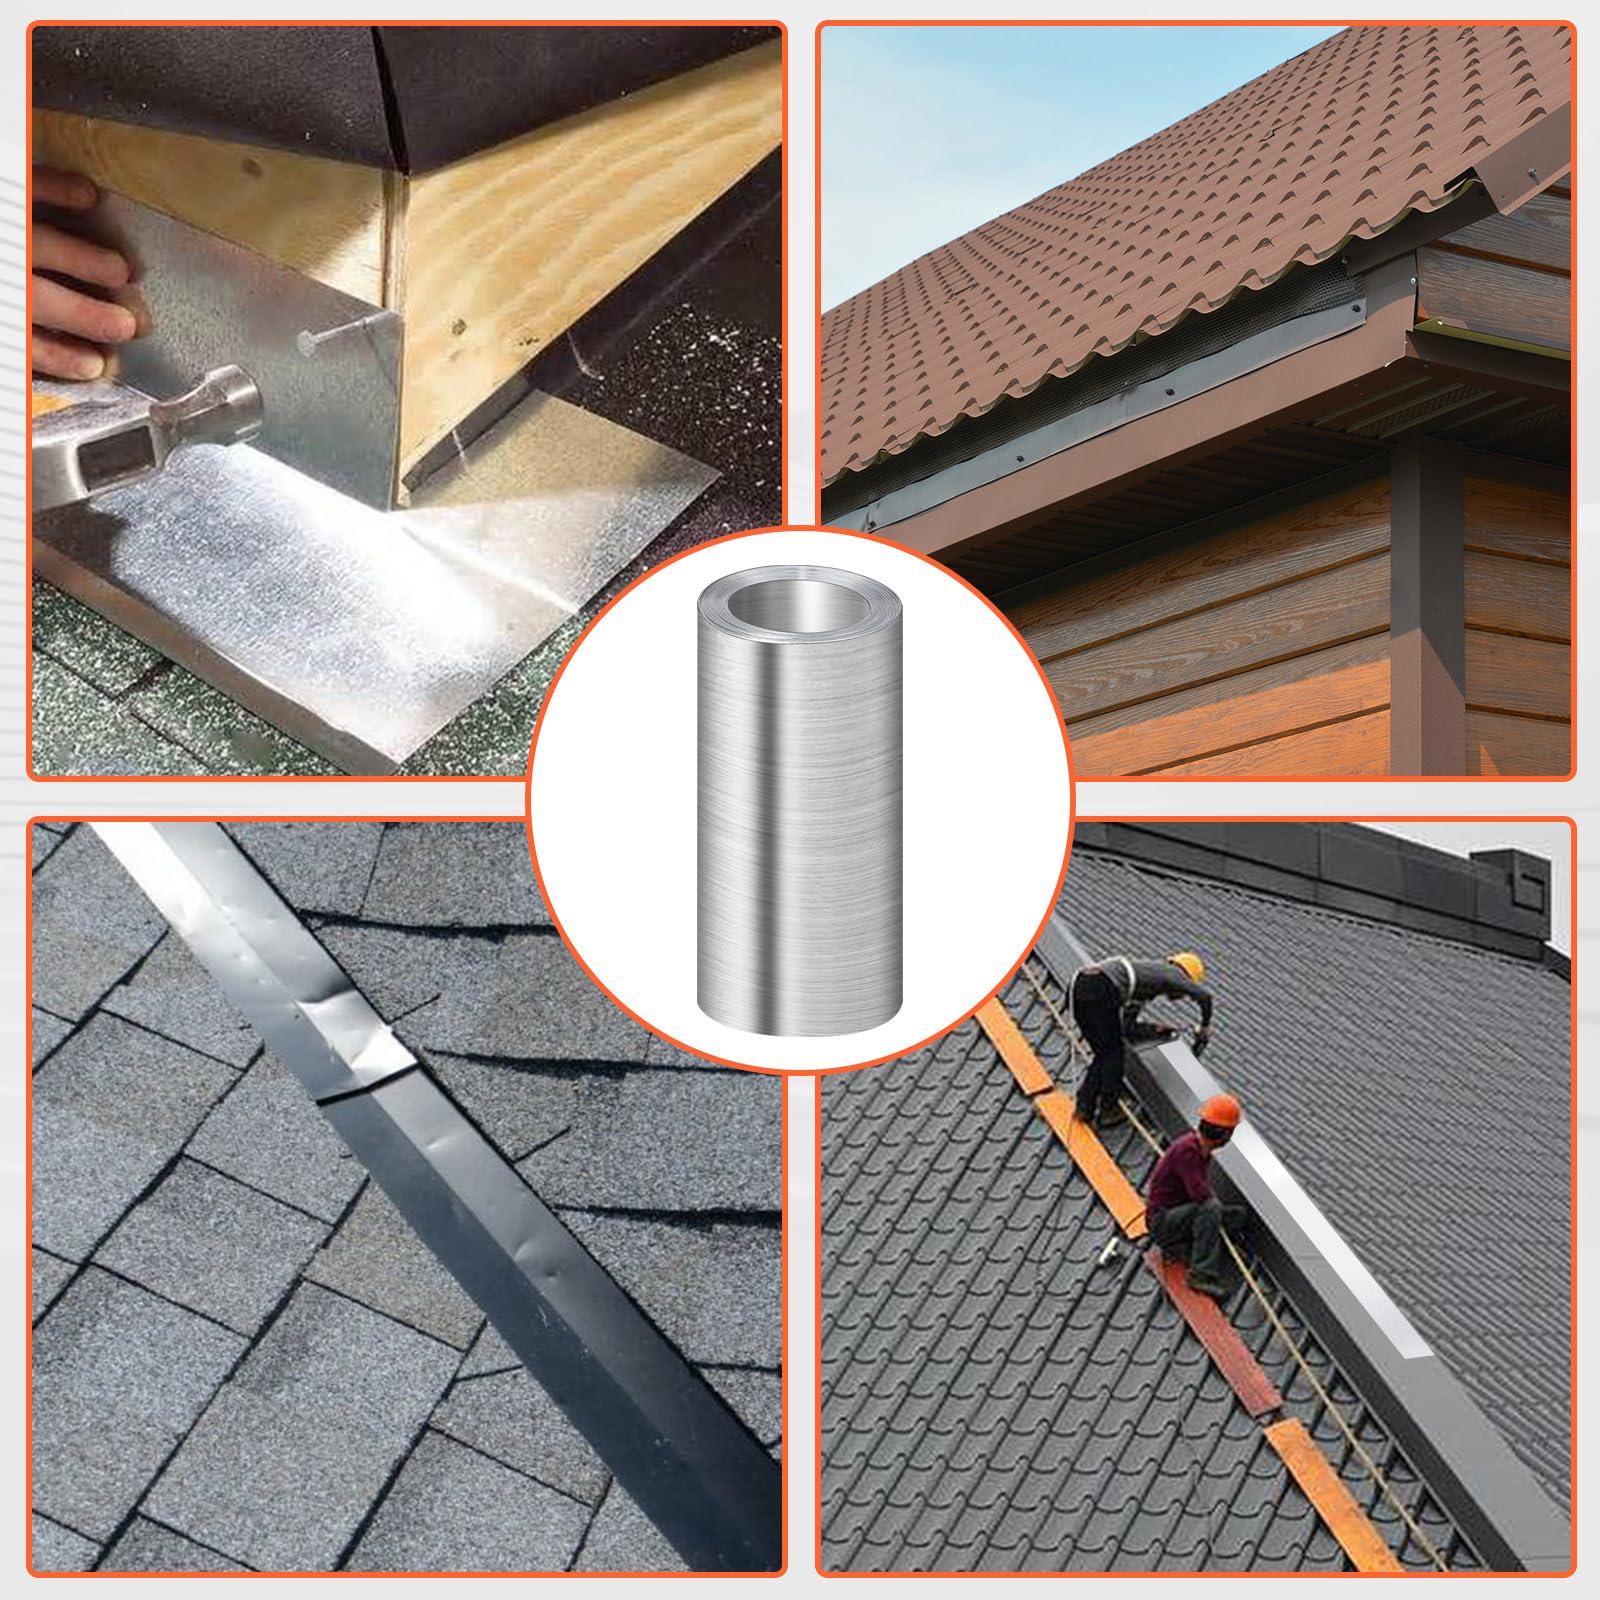
Metal flashing is a thin, waterproof sheet installed at vulnerable spots on your roof. Its job is simple: direct rainwater away from your home’s structure. Without it, water seeps into walls, chimneys, and valleys, causing rot and mold.
There are several roof flashing types, each for a specific spot. Drip edge goes along eaves to keep water from running behind gutters. Step flashing protects where a roof meets a wall. Valley flashing handles high water flow where two roof slopes meet. Counter flashing seals the top of base flashing on chimneys. Vent pipe flashing wraps around pipes poking through the roof. And kickout flashing at the bottom of a roof-wall intersection pushes water away from siding.
Materials matter. Galvanized steel is affordable and tough. Aluminum won’t rust and is easy to bend. Copper lasts decades and develops a green patina. Stainless steel is strongest but costs more. At Home Depot or Lowe’s, a roll of flashing runs $20 to $120. Professional installation for a typical roof costs $300 to $1,500. Choosing the right material and type stops leaks before they start.
Metal Flashing: Your Home’s First Line of Defense
Metal flashing is not just a component; it’s a crucial shield protecting your home from water damage. These thin metal sheets are expertly placed at critical junctures where different building materials meet. Their job is simple yet vital: to guide water away from your home’s structure and into your drainage system, preventing costly leaks and rot. You’ll find them around chimneys, vents, windows, doors, and where walls meet roofs. Understanding its importance is key to a dry, healthy home.
Think of flashing as the unsung hero of weatherproofing. Without it, water can seep into the smallest cracks, causing mold, mildew, and structural decay over time. This is especially true at roof valleys and intersections, which handle significant water flow. Proper installation of various roof flashing types ensures that your home remains protected, no matter the weather. Investing in quality flashing is an investment in your home’s longevity and your peace of mind.
| Flashing Type | Primary Function | Common Materials |
|---|---|---|
| Drip Edge | Directs water into gutters, protects fascia | Galvanized Steel, Aluminum |
| Step Flashing | Seals roof-to-wall intersections | Galvanized Steel, Aluminum |
| Valley Flashing | Manages high water volume at roof valleys | Galvanized Steel, Aluminum, Copper |
| Counter Flashing | Final seal over base flashing | Galvanized Steel, Aluminum, Copper |
| Vent Pipe Flashing | Seals around roof penetrations | Rubber boots, Galvanized Steel |
| Kickout Flashing | Directs water away from siding | Galvanized Steel, Aluminum |
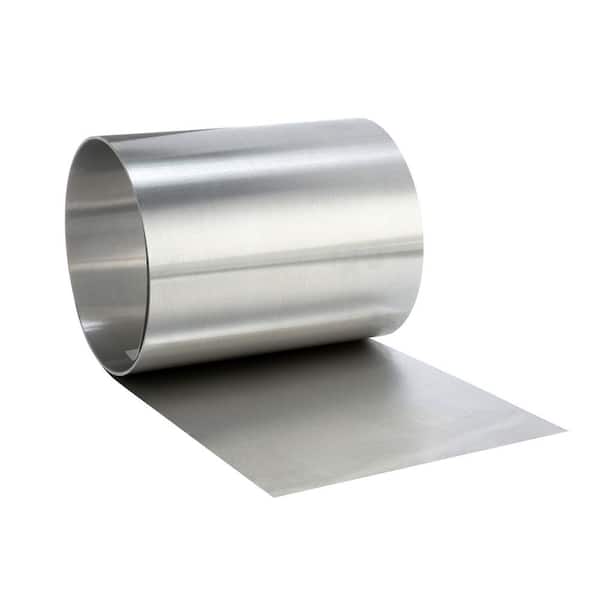
Galvanized Steel Flashing for Durability
Galvanized steel is a workhorse in the construction world, and for good reason. Its protective zinc coating offers excellent resistance to rust and corrosion, standing up well against the elements. This makes it a reliable choice for many applications, providing long-lasting protection without breaking the bank. The importance of flashing in construction cannot be overstated, and galvanized steel offers a cost-effective solution for many homeowners.
Read also: Roof Repair Costs in 2026: What You’ll Actually Pay
It’s strong and relatively easy to work with, making it a favorite for installers. You can find rolls of galvanized steel flashing for custom jobs or pre-formed pieces for specific needs. For example, a 50-foot roll of 6-inch wide galvanized steel flashing might cost around $30 to $60. This material is a smart choice for general weatherproofing needs, offering a good balance of performance and affordability. It’s a standard for a reason.
Aluminum Flashing for Lightweight Protection
Aluminum flashing is a great option when weight is a concern or when you need superior corrosion resistance. It’s naturally resistant to rust, making it ideal for coastal areas or places with high humidity. Aluminum is also very flexible and easy to cut and shape, which can simplify installation, especially for complex roof designs. Its lightweight nature makes it easier to handle on the job site.
Aluminum flashing is highly recommended for its longevity and low maintenance. It’s a smart choice for preventing water penetration at vulnerable joints.
While it’s generally more expensive than galvanized steel, its resistance to corrosion can lead to longer service life. A 50-foot roll of aluminum flashing might range from $50 to $90. It’s a good material to consider for window and door perimeters where flexibility and weather resistance are paramount. Always check if it needs a coating when used with dissimilar metals to prevent galvanic corrosion.
Copper Flashing for Premium Roofs
Copper flashing represents a premium choice for homeowners seeking exceptional durability and a unique aesthetic. Over time, copper develops a beautiful green patina, which is not only attractive but also provides an additional layer of protection against corrosion. This material is incredibly long-lasting, often outlasting the roof itself. Its use signifies a commitment to quality and timeless design.
The upfront cost for copper flashing is higher, with rolls potentially costing $150 or more for 50 feet. However, its lifespan and minimal maintenance requirements can make it cost-effective in the long run. Copper is often chosen for high-end homes or historic restorations where its appearance and longevity are highly valued. It’s a material that truly stands the test of time.
Stainless Steel Flashing for Corrosion Resistance
For the most demanding applications, stainless steel flashing is the ultimate solution. It offers superior strength and unmatched resistance to corrosion, making it ideal for areas exposed to harsh chemicals, extreme weather, or high traffic. While it comes with a higher price tag, its performance in challenging environments is unparalleled. This is the material you choose when you need the absolute best protection.
The cost of stainless steel flashing can be significantly higher, sometimes double or triple that of galvanized steel. However, its extreme durability means fewer repairs and replacements over the life of the building. It is often used in commercial applications or for critical areas on residential roofs where failure is not an option. Its robust nature ensures reliable performance for decades.
Step Flashing for Roof-Wall Intersections
Step flashing is specifically designed to create a watertight seal where a sloped roof meets a vertical wall, like around a dormer. It consists of L-shaped pieces that are installed in an overlapping, staggered pattern. Each piece steps down the roof, allowing water to flow down the roof and away from the wall. This is a critical area for preventing leaks, as water naturally wants to run down vertical surfaces.
Proper installation of step flashing is vital. If not overlapped correctly, water can easily find its way behind the flashing and into your home. This type of flashing is typically made from galvanized steel or aluminum for durability and cost-effectiveness. It’s a common component in many roof repair scenarios.
Valley Flashing for Water Channeling
Roof valleys are where two sloping roof sections meet, creating a channel that directs a large volume of water. Valley flashing is installed in this critical area to handle this water flow and prevent leaks. It’s essentially a trough that guides water safely down to the gutters or other drainage points. Without adequate valley flashing, this area is highly susceptible to water intrusion.
This flashing is often made from wider pieces of metal, like galvanized steel or copper, to accommodate the high water volume. The installation requires careful attention to ensure there are no gaps or seams where water can penetrate. It’s a key element in maintaining the integrity of your roof system.
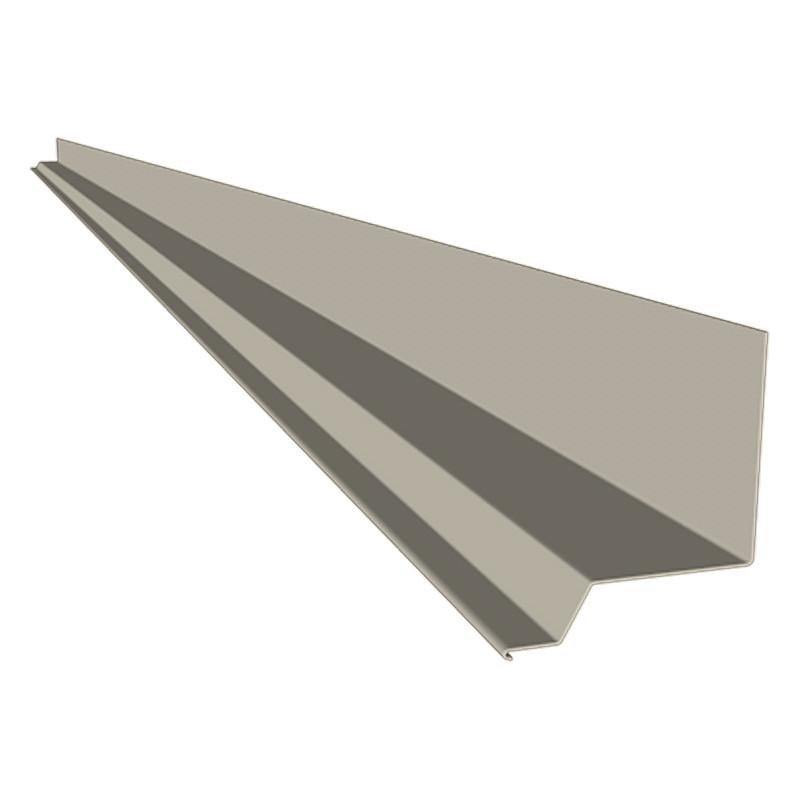
Drip Edge Flashing for Fascia Protection
Drip edge flashing is installed along the edges of your roof, both at the eaves (bottom edge) and the rakes (sloping sides). Its primary purpose is to direct water away from the roof deck and fascia boards, preventing water from running down the side of your house. This helps protect the wooden fascia from rot and water damage. It also helps water flow directly into your gutters.
This simple yet effective component is usually made from galvanized steel or aluminum. You can purchase it in standard lengths, making installation straightforward. It’s a relatively inexpensive part of the roofing system, but its role in preventing water damage to your home’s exterior is significant. Look for drip edge flashing at your local home improvement store.
DIY Metal Flashing Installation Tips
While professional installation is always recommended for critical areas like roof valleys, some flashing tasks can be tackled as a DIY project. For simple applications like replacing a piece of drip edge or installing new vent pipe flashing, careful planning and the right tools are essential. Always wear appropriate safety gear, including gloves and eye protection. Measure twice, cut once is the golden rule here.
For DIYers, using pre-formed pieces can simplify the process. Ensure that any new flashing overlaps existing materials correctly to maintain a watertight seal. If you’re unsure about any step, especially on the roof, it’s best to consult a professional. Mistakes in flashing installation can lead to significant water damage. Resources from places like Lowe’s and Home Depot offer helpful guides.
When working with metal flashing, remember that sharp edges are common. Always use heavy-duty gloves to protect your hands. For cutting, tin snips or a metal shear will be necessary. Ensure that fasteners, like roofing nails or screws, are properly sealed to prevent them from becoming entry points for water. Consider using a high-quality roofing sealant to reinforce seams and edges.
Professional Roof Flashing Services
For most homeowners, especially when dealing with complex roof designs or significant repairs, hiring a professional is the wisest course of action. Experienced roofers have the knowledge, tools, and safety equipment to install flashing correctly the first time. They understand the nuances of different materials and how they interact with your specific roofing system. This expertise ensures optimal performance and prevents future problems.
The cost for professional installation can range from $300 to $1,500, depending on the scope of work and materials chosen. This investment is well worth it to guarantee that critical areas are properly sealed against water intrusion. A professional can also identify existing issues that might require attention. Don’t underestimate the value of expert installation for long-term protection.
The Future of Flashing in 2026
In 2026, metal flashing remains an indispensable part of building construction, with a continued focus on durability and performance. We’re seeing advancements in material coatings that offer even greater corrosion resistance and longevity. The demand for sustainable and recyclable materials is also growing, pushing manufacturers towards more eco-friendly options without compromising strength.
Expect to see more integrated flashing systems that work seamlessly with modern roofing materials. Innovations in manufacturing allow for more precise, custom-fit flashing solutions, reducing installation time and potential error. The core function of metal flashing—protecting homes from water—will never change, but the materials and methods will continue to evolve to meet new challenges and homeowner expectations. It’s a vital component that will only get better.
Your Action Plan for Metal Flashing
Step 1: Inspect and Identify
Walk around your home after a rainstorm. Look for water stains or drips near chimneys, vents, and roof valleys.
Use binoculars to check the flashing from the ground. You want to spot any rust, gaps, or loose pieces.
Step 2: Choose Your Material
For most homes, galvanized steel gives you the best balance of cost and durability. If you live near the coast, pick aluminum or stainless steel to resist salt corrosion.
Copper is beautiful but expensive. Only choose it if you are okay with the higher price and the green patina that develops over time.
Step 3: Repair or Replace
Small gaps can be sealed with a high-quality roofing caulk. For larger damage, replace the entire section of flashing.
Always overlap pieces by at least three inches. This rule is critical to keep water from seeping through the joints.
Frequently Asked Questions
Can I install metal flashing myself?
Yes, if you are comfortable on a ladder and have basic tools like tin snips and a hammer. But for complex roofs or steep slopes, hire a pro to avoid injury and leaks.
How long does metal flashing last?
Galvanized steel lasts about 20 to 30 years. Copper and stainless steel can last over 50 years with proper installation.
What is the most common mistake with flashing?
Not overlapping pieces enough or using the wrong type of fastener. Always use compatible metals to prevent corrosion, like stainless steel screws for aluminum flashing.
Metal flashing is a small investment that protects your entire home from water damage. Choosing the right material and installing it correctly will save you thousands in repairs.
Now is the time to check your own flashing. Start with the easy visual inspection from the ground, and call a roofer if you spot any red flags.
Imagine your home staying dry and strong through every storm. That peace of mind is worth a little time and effort today.