

That drip from your ceiling might not be a roof shingle problem. Nine times out of ten, a roof leak starts at the flashing, not the shingles. Flashing is the thin metal piece that seals the weak spots on your roof, like around your chimney or where your roof meets a wall.
When flashing fails, water finds a way in. Ignoring a small leak can lead to rot, mold, and expensive structural damage. The good news is that understanding your roof’s flashing is the first step to stopping leaks for good.
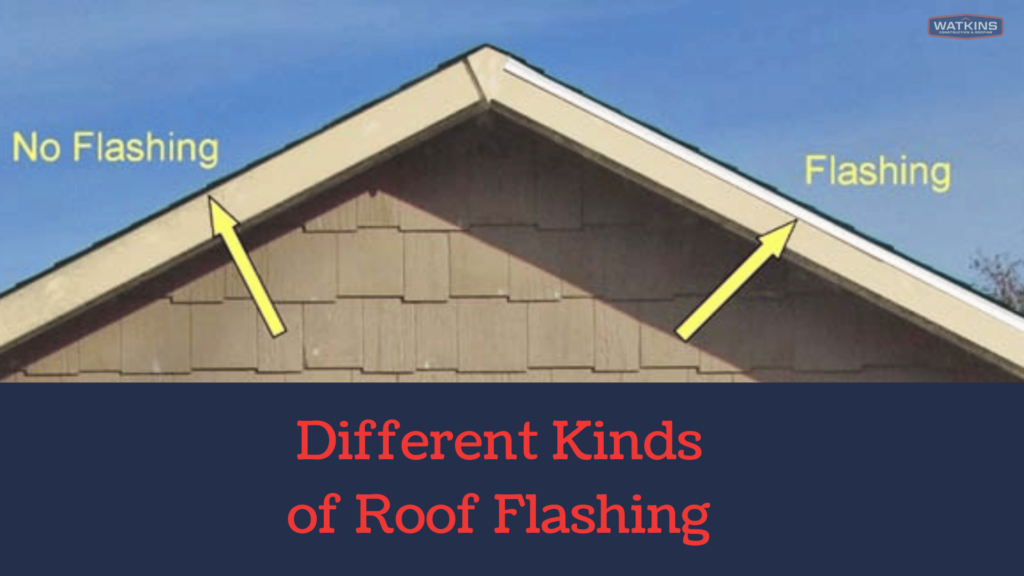
What Is Roof Flashing and Why Does It Fail?
Roof flashing is a waterproof barrier installed at roof joints and penetrations. It’s typically made from galvanized steel, aluminum, or copper. Its job is to redirect water away from vulnerable areas like chimneys, vents, and valleys where two roof slopes meet.
Most flashing failures happen because of rust, cracks, or loose sections. Sealant around the flashing can also dry out and crack over time. In 2026, a professional repair for standard flashing issues usually costs between $200 and $600. More complex jobs, like chimney flashing, can run over $1,000.
Regular inspection is key. Look for signs of wear such as rust, holes, or lifted edges. Catching problems early can save you from a major roof replacement down the road.
The Unsung Heroes of Your Roof: Understanding Flashing

In 2026, the integrity of your home relies heavily on often-overlooked components like roof flashing. These metal strips act as critical waterproof barriers. They protect vulnerable areas where your roof meets walls, chimneys, or other surfaces. Without proper flashing, water can seep into your home. This leads to costly damage like wood rot and persistent leaks.
Flashing directs water away from these crucial junctions. Materials like galvanized steel, aluminum, and copper are common choices. Each offers different benefits in terms of cost, durability, and appearance. Regular checks for rust, cracks, or loose sections are vital for preventing major issues and ensuring effective weatherproofing.
| Flashing Type | Material Options | Primary Function | Common Issues |
| Step Flashing | Galvanized Steel, Aluminum | Wall-to-roof intersections | Rust, Tears, Loose Sections |
| Valley Flashing | Galvanized Steel, Aluminum, Copper | High-volume water channels | Corrosion, Clogs, Leaks |
| Drip Edge | Aluminum, Steel | Eaves and rakes | Bends, Rust, Improper Overlap |
| Pipe Boots | Rubber, Metal | Around vent pipes | Cracked Rubber, Loose Clamps |
| Chimney Flashing | Galvanized Steel, Copper | Base and sides of chimney | Gaps, Rust, Deteriorated Sealant |
Roof Leak Repair: Finding the Source
When you suspect a roof leak, the first step is pinpointing the exact source, which is often not directly below the visible water stain. Water can travel along roof decking or rafters before dripping inside, making diagnosis tricky. Common culprits include damaged flashing around penetrations or deteriorated seals. A thorough roof inspection checklist is your best friend here, looking for obvious signs of wear and tear.
Read also: 61 Garage with Apartment Above Ideas That Pay for Themselves
Identifying the precise location is key to a successful roof leak repair. Ignoring the true origin point means the problem will likely resurface. This is where professional roofing services often prove invaluable, as they have the experience to trace leaks accurately.
Metal Roofing Flashing: Durability and Cost
For homes with metal roofing, the flashing is typically made from the same or a compatible metal to ensure seamless integration and performance. Galvanized steel offers a cost-effective solution, while aluminum provides excellent rust resistance and is easier to shape. Copper, though more expensive, offers superior longevity and a premium aesthetic, especially for historical homes. The durability of metal flashing contributes significantly to long-term weatherproofing.
The choice of metal for flashing should balance initial cost with expected lifespan and resistance to local climate conditions.
When considering metal roofing, the flashing is just as important as the panels themselves. Ensure your installer uses high-quality materials and proper techniques for all flashing details. This prevents premature failure and costly repairs down the line.
Skylight Flashing: Preventing Water Damage
Skylights are beautiful additions, but they are also common sites for leaks if the flashing isn’t installed correctly or maintained. Proper skylight flashing involves a multi-piece system that integrates with the roofing material to create a watertight seal around the skylight frame. Issues like cracked sealant, loose nails, or improperly overlapped flashing can allow water intrusion, leading to significant water damage prevention challenges.
Read also: Why Your Roof Leaks Could Be From Failed Metal Flashing
Regular inspections of skylight flashing are essential, especially after heavy storms. Look for any signs of deterioration in the sealant or metal components. Addressing minor issues promptly can save you from extensive repairs and potential mold growth within your attic or walls.
Chimney Flashing: Common Problems and Fixes

Chimneys are complex roof penetrations and require specialized flashing. This typically involves a base flashing that integrates with the roof and a counter-flashing that covers the top edge of the base flashing, often secured into the masonry. Common problems include rust on metal flashing, gaps where the flashing meets the chimney or roof, and deteriorated sealant. These issues can lead to serious leaks and structural damage.
Chimney repair involving flashing often requires skilled labor. It’s crucial to ensure the flashing is correctly installed to shed water away from the chimney base and the roof. For older homes, copper flashing might be a worthwhile investment for its longevity and resistance to corrosion.
DIY Roof Flashing: When to Call a Pro
While minor DIY roof flashing repairs might seem appealing, many homeowners underestimate the complexity and risks involved. Working on a roof is dangerous, and improper installation can lead to more significant problems than you started with. Tasks like replacing step flashing or repairing valley flashing often require specialized tools and knowledge of building codes.
For most homeowners, it is safer and more effective to hire professional roofing services for flashing work. They have the expertise to identify the root cause of leaks and perform durable repairs. The cost of a professional repair is often less than the cost of fixing DIY mistakes.
Gutter Maintenance and Flashing Integration
Your gutters and roof flashing work together to manage water. Clogged gutters can cause water to back up onto the roof and into areas where flashing might be compromised. Proper gutter maintenance ensures that water is directed away from your foundation and roof edges effectively.
Pay attention to how water flows from your roof. If you notice water overflowing from gutters or pooling near the roof edge, it could indicate an issue with either the gutters or the drip edge flashing. Ensuring these systems work in harmony is key to overall home protection.
Roof Penetrations: Sealing Vents and Pipes
Vent pipes, plumbing stacks, and satellite dish mounts are all roof penetrations that require careful flashing to prevent leaks. The most common solution is a rubber boot flashing, which fits over the pipe and seals against the roof. Over time, the rubber can dry out, crack, and become brittle, especially when exposed to constant sunlight. This is a frequent cause of leaks around vents.
Regularly inspecting these roof penetrations for signs of wear is important. Replacing a cracked pipe boot is a relatively simple repair, but if left unaddressed, it can lead to significant water damage prevention failures. Ensure the flashing is correctly sized and sealed to the roof deck.
Cost of Roof Flashing Repair: What to Expect
The cost of roof flashing repair can vary significantly based on the type of flashing, the extent of the damage, and your location. Minor repairs, like resealing flashing around a vent pipe, might cost between $200 and $400. More complex jobs, such as repairing or replacing flashing in a roof valley or around a chimney, can range from $500 to over $1,000.
When getting quotes, ensure they specify the materials to be used and the scope of work. It is often more cost-effective in the long run to address flashing issues proactively rather than waiting for a major leak to occur. Understanding these costs helps in budgeting for necessary home maintenance.
The Future of Roof Flashing in 2026
In 2026, roof flashing remains a fundamental element of home protection. Innovations are focusing on more durable materials and integrated flashing systems that simplify installation and enhance longevity. Expect to see increased use of advanced sealants and composite materials designed to withstand extreme weather. The emphasis will continue to be on proactive maintenance and early detection of issues.
Homeowners must prioritize understanding the importance of flashing as part of their overall roof inspection checklist and maintenance routine. Investing in quality flashing and timely repairs is not just about preventing leaks; it’s about safeguarding the structural integrity and value of your home for years to come. The trend is towards smarter, more resilient building practices.
Read also: Roof Repair Costs in 2026: What You’ll Actually Pay
Your 3-Step Action Plan for Flashing Roof Success
Step 1: Inspect your flashing twice a year. Check in spring and fall for obvious signs of rust, cracks, or loose sections. Pay special attention around chimneys, vents, and valleys where water flow is heaviest.
Step 2: Test sealant integrity. Gently press a putty knife against the caulking at joints. If it feels hard, brittle, or is missing, remove old sealant and apply a high-quality polyurethane or butyl sealant rated for roofing.
Step 3: Schedule professional repairs at first sign of trouble. Small fixes cost $200 to $600, but delaying can lead to wood rot and interior leaks that cost thousands. A licensed roofer can confirm if flashing needs replacement or just resealing.
Frequently Asked Questions
Can I install flashing myself? Simple step flashing on a low-slope roof is DIY-friendly if you have basic metalworking skills. However, complex chimney or valley flashing requires a pro to avoid leaks.
How long does roof flashing last? Galvanized steel lasts 15-20 years; aluminum 20-30 years; copper 50+ years. Lifespan depends on climate and installation quality.
Why does my flashing leak after a new roof? Often the old flashing wasn’t replaced or was improperly integrated. Always insist on new flashing during a reroof to meet modern building codes.
Choosing the right flashing material and maintaining it properly is one of the smartest investments in your home’s longevity. A small upfront cost saves you from major structural repairs down the road.
Now that you understand flashing basics, schedule a professional inspection to catch any hidden issues. Your next step is to ask your roofer about material options that fit your budget and climate.
Imagine your home with a watertight roof that stands strong for decades. That peace of mind is achievable with just a little attention to those hidden metal barriers.